Basement Insulation and Mold Prevention 2026 Tool
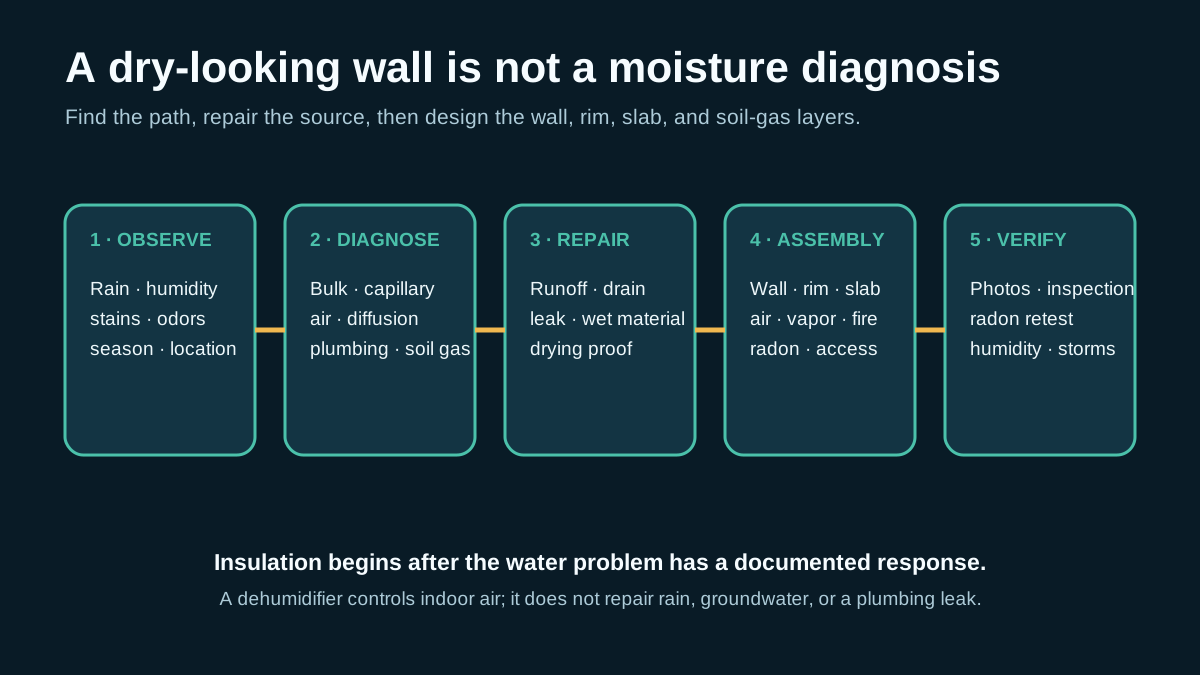
Diagnose bulk water, capillary moisture, humidity, condensation, soil gas, and hidden damage before choosing a basement wall, rimjoist, or floor insulation assembly.
Quick Checks
- 1Resolve active water entry and document drying before covering a foundation wall.
- 2Keep air-permeable insulation and paper-faced finishes away from damp masonry unless a designed assembly separates them.
- 3Test for radon before finishing a lower level and retest after major changes or new occupancy.
The Underground risk
Short Answer: Fix active water entry and identify the basement's moisture paths before installing insulation or finishes. A safe retrofit separates moisture-sensitive framing from masonry, controls indoor air contact with cold surfaces, preserves an intentional drying path, manages the slab and rim joist, and includes fire, radon, pest, and code details. The right assembly depends on foundation type, climate, drainage, and intended use.
You want more space. You have a cold, concrete box under your house. You think: "I'll put up some 2x4s, stuff pink fluffy insulation between them, slap up drywall, and make a playroom."
Pause before covering the foundation. Air-permeable insulation and paper-faced finishes can support hidden mold when damp masonry, indoor humidity, and cold surfaces aren't managed as one assembly.
Basements are not like the rest of your house. They are buried in wet, cold dirt. The physics of moisture movement underground are aggressively trying to destroy your finished work.
The correct detail depends on whether the foundation is poured concrete, block, brick, stone, or another system; how it manages water; and whether insulation sits inside or outside.
Part 1: The Enemy is Water (And It's Everywhere)
Concrete is not solid. It is a hard sponge.
- Capillary Action: Concrete has billions of microscopic pores. Water wicks through it from the damp soil outside.
- The Result: Even if your basement wall looks dry, it is constantly releasing water vapor into the interior.
The Golden Rule: Never put organic material (wood studs, paper-faced drywall) or moisture-absorbing material (fiberglass) in direct contact with concrete.
If you risk that moisture behind a vapor barrier (like plastic sheeting) on the inside, you create a mold incubator.
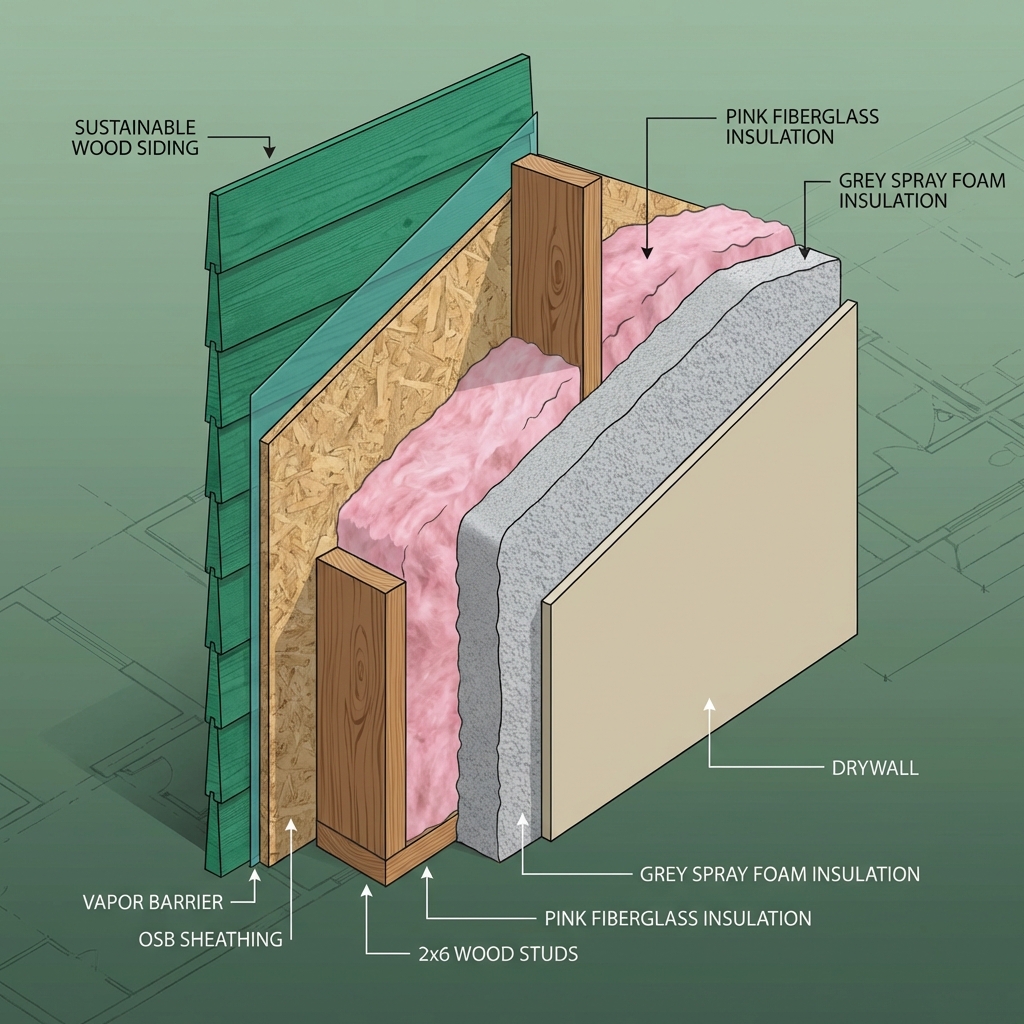
Part 2: The Solution – The "Foam Sandwich"
To finish a basement safely, you must treat the concrete as a wet surface and manage it.
Step 1: Specific Water Management
Before you insulate, fix bulk water.
- Direct roof runoff to a legal discharge point away from the foundation.
- Correct settlement or grading that sends surface water toward the wall.
- Diagnose active leakage before selecting crack repair, exterior drainage, interior drainage, sump, or another measure.
Step 2: The Continuous Thermal Break
You must separate the cold, wet concrete from your warm, dry framing.
- Material: A code-compliant rigid-foam, spray-foam, or other designed foundation-wall assembly suited to the wall and moisture conditions.
- Installation: Where rigid board is specified, keep it in contact with the wall, seal joints with compatible materials, and integrate the top, bottom, corners, and penetrations with the air and moisture-control plan.
- Why: This foam acts as a vapor retarder (slowing moisture) and an air barrier (stopping condensation). It keeps the concrete warm(er) to prevent condensation.
Step 3: The Framing
Now, build your 2x4 stud wall inside the foam layer.
- Gap: Follow the tested assembly and code details; an arbitrary gap can permit indoor air circulation and condensation.
- Cavity insulation: Add it only when the foundation-side control layer, exterior-to-interior R-value, drying path, framing moisture, and fire details support it.
Step 4: The Drywall
Use paperless drywall (fiberglass faced) if possible, especially on the bottom 2 feet. It creates no food source for mold.
Part 3: The Floor (Cold Feet Syndrome)
Do not install moisture-sensitive flooring until slab vapor, bulk-water, and condensation conditions are understood. EPA warns that cold slabs and vapor movement can leave carpet and padding chronically damp.
Possible designed retrofit: drainage or vapor-control layer, compatible rigid insulation, a floating subfloor, and a finish rated for the assembly. Headroom, stairs, doors, radon, sump access, flood exposure, slab condition, and code determine whether that stack works.
Part 4: Radon the Silent Killer
While you are messing with the basement, test for Radon.
- What is it? A radioactive soil gas that can enter through foundation openings and materials.
- The Stack Effect Connection: Remember Article 1? Your house sucks on the soil like a straw. It pulls radon right in through foundation cracks.
- Action: Test with an approved method and follow the current health authority's action guidance. Mitigation design and price depend on the foundation and jurisdiction; sealing alone isn't a substitute for a verified system when mitigation is required.
Part 5: The "Unfinished" Strategy
Maybe you don't need a finished room. You just want warmer floors upstairs and lower bills.
The Rim Joist (Again) The rim joist is often an important air and thermal transition, but inspect it for leakage, moisture, pests, fire separation, and existing exterior details before selecting foam or another assembly. Use the rim-joist assembly guide for the bay survey, then verify the result with the blower door test guide.
The "Blanket" Approach Some unfinished basements have blanket insulation. PNNL warns that plastic-faced blanket directly against a foundation with poor moisture management can risk moisture. Inspect the wall and product facing, repair water sources, and use a code-compliant assembly that preserves the intended drying path.
The Verdict
Basements are high-risk, high-reward.
- Cover a wet wall: Damage can remain hidden behind framing and finishes.
- Document moisture control first: The insulation, air barrier, drying path, and finishes can be selected for the actual foundation.
Physics doesn't care about your budget. Respect the moisture, or it will eat your renovation.
Identify the Water Path Before Choosing Materials
“Damp basement” isn't a diagnosis. Water can arrive as rain runoff, groundwater, plumbing leakage, capillary transport, vapor through concrete, humid-air condensation, or air leakage. Several can occur at once. For an adjacent dirt-floor or vented foundation, use the crawlspace encapsulation decision guide before moving the air and thermal boundary.
Use this field table:
| Evidence | Likely path to investigate | Do before insulation |
|---|---|---|
| Wet after rain near one wall | Grade, downspout, window well, crack, exterior drainage | Trace runoff and repair the source |
| Water at wall-floor joint during storms | Groundwater or perimeter drainage | Assess drainage and sump strategy |
| White mineral deposits on masonry | Repeated moisture movement through wall | Map extent and identify exterior/interior source |
| Summer dampness on cool surfaces | Humid-air condensation | Measure dew point, surface temperature, and air entry |
| Local stain below pipe or fixture | Plumbing leak or condensation | Repair and dry the assembly |
| Musty odor behind finished wall | Hidden wet material | Open a controlled inspection area with proper safety precautions |
| Damp slab or flooring | Ground moisture, liquid entry, or condensation | Test and design the floor assembly |
Keep a weather log. Note rainfall, snowmelt, outdoor dew point, indoor temperature and humidity, sump operation, and the time the symptom appears. A wall that stays dry through ordinary weather can still fail during spring thaw or a long storm.
EPA's homeowner guidance is simple: control moisture and fix the water problem. Insulation cannot perform that repair.
Stop Conditions Before Finishing
Pause the project when you find active water, wet framing, visible mold-like growth, crumbling masonry, significant cracks or movement, corroded structural steel, damaged wiring, fuel-gas odor, combustion spillage, sewage, pests, or suspect asbestos- or lead-containing materials.
Do not cover a wall because one handheld meter reads “dry.” Concrete and masonry can confuse meters, moisture varies by location and season, and concealed materials may remain wet. A qualified investigation should match the risk.
For mold, EPA says to clean up growth and fix the moisture source. Large, recurring, contaminated, or health-sensitive situations need appropriate professional advice. Do not spray a coating over wet or moldy porous material and call it remediated.
Map the Existing Foundation Assembly
Record these items before asking for an insulation quote:
- poured concrete, concrete block, brick, stone, rubble, wood, or mixed foundation;
- wall thickness and visible condition;
- exterior dampproofing, waterproofing, drainage board, footing drain, or unknown status;
- slab, crawlspace, dirt floor, sump, interior drain, and floor drains;
- above-grade exposure and frost risk;
- sill, rim joist, beam pockets, columns, ledges, and framed walkout walls;
- utilities, electrical panel, plumbing, ducts, fuel appliances, and cleanouts;
- termite or pest inspection requirements;
- current wall finish and hidden cavity condition;
- intended use: storage, mechanical space, occasional room, bedroom, rental, or full living area.
Irregular stone or brick can be much more vapor- and water-permeable than a flat poured-concrete wall. A detail that works on sound concrete may not fit soft mortar, historic masonry, or a foundation that needs inward drying.
Choose an Interior Wall Assembly by Function
PNNL shows rigid foam and closed-cell spray foam as common interior options for existing foundation walls after water problems are corrected. The exact product, thickness, fire protection, pest detail, and interior framing come from the wall, climate, code, and manufacturer.
Rigid-board control layer
A designed rigid-board layer can limit indoor air contact with cold masonry and provide continuous insulation. The board must remain in contact with the wall where the system requires it. Seams, corners, top, bottom, and penetrations need compatible sealing.
Plan how incidental moisture reaches a drain or drying path. Do not assume taped board is a waterproofing system. Check foam-plastic fire protection and termite inspection requirements.
Closed-cell spray foam
Spray foam can conform to irregular surfaces and provide insulation plus air control. The contractor must document substrate condition, thickness, product approval, ignition or thermal barrier, ventilation during application, re-entry, overspray control, and access to concealed services. It should not hide an active leak or deteriorating masonry.
Hybrid framed wall
A framed service wall may sit to the interior of a continuous control layer. Cavity insulation can add R-value, but only after the exterior-to-interior assembly has been reviewed for condensation and drying. Keep moisture-sensitive materials out of contact with masonry and the slab.
Exterior foundation insulation
Exterior work can keep the foundation warmer and coordinate waterproofing and drainage. It may be practical during excavation for another reason. Scope digging safety, utilities, structure, waterproofing, footing drainage, protection board, pest access, termination above grade, stairs, porches, and landscaping.
Coordinate the Rim Joist and Wall Top
The wall insulation, sill, and rim-joist air barrier must connect. A gap at the top can let indoor air circulate behind insulation and condense on cold masonry. But beam pockets, masonry irregularities, fire blocking, wiring, plumbing, and pest inspection strips complicate that connection.
Photograph every joist bay before covering it. Mark wet wood, staining, insect evidence, missing sill gasket, penetrations, and exterior deck or porch connections. Repair the cause before insulation.
Use the vapor-retarder assembly guide before adding a low-perm layer to a rim or framed walkout wall that already has exterior foam, foil, or another retarder.
Design the Floor as a Separate Assembly
The wall can be dry while the slab is not. Inspect cracks, joints, penetrations, sump, floor drains, height changes, and signs of vapor or liquid movement. Check headroom, stair geometry, door clearances, ceiling height, and transitions before adding layers.
PNNL's existing-slab guidance describes a possible sequence of water-control layer, rigid insulation, and floating subfloor after persistent water is addressed. It also recommends considering radon before sealing the slab. That is one system, not a universal kit.
Ask the designer to show:
- liquid-water route and drainage destination;
- vapor-control layer and sealed transitions;
- insulation type and compressive support;
- subfloor attachment or floating method;
- finish-floor compatibility;
- flood and leak recovery plan;
- access to sump, cleanouts, and drains;
- radon and soil-gas connection;
- stair, door, and ceiling compliance.
Avoid finishes that cannot be removed or dried in a basement with known flood exposure.
Include Radon, Ventilation, and Combustion Safety
Test radon before converting a lower level to occupied space. EPA says to retest when living patterns move to a lower level and after renovations that can alter the building. Preserve the test conditions and results in the project file.
Air sealing can change pressure relationships. Inventory furnaces, boilers, water heaters, fireplaces, dryers, exhaust fans, and attached-garage connections. Arrange qualified combustion-safety and ventilation review where fuel-burning equipment or depressurization risks exist.
The finished basement also adds occupancy moisture, odors, and pollutants. Size ventilation and dehumidification from the actual space, climate, enclosure, and use. A dehumidifier can control indoor humidity; it cannot stop rain or groundwater.
If measured humidity remains elevated after bulk-water and source corrections, use the whole-house dehumidifier versus AC guide to compare portable-zone and ducted control, moisture-load evidence, air distribution, condensate, and commissioning.
EPA recommends keeping indoor relative humidity below 60%, ideally 30–50% where practical. Treat that as indoor guidance, not proof that a concealed wall is dry.
Sequence the Project
- Document symptoms across wet and humid seasons where timing allows.
- Test radon and inspect structure, electrical, plumbing, combustion, pests, and hazardous materials.
- Repair roof runoff, grade, penetrations, plumbing, drainage, and active leakage.
- Remove damaged porous finishes under an appropriate remediation plan.
- Confirm drying and recheck during relevant weather.
- Define wall, rim, slab, air, vapor, thermal, fire, and drainage layers.
- Coordinate stairs, egress, windows, utilities, and future access.
- Install control layers before moisture-sensitive finishes.
- Photograph concealed work and inspect before drywall or flooring.
- Commission ventilation, dehumidification, leak protection, sump, and combustion systems.
- Retest radon and monitor humidity and water after completion.
Worked Decision: Block Wall With Summer Dampness
Suppose a 1960s block basement has no visible storm leakage, but the lower wall smells musty each summer. Indoor air is 75°F at 70% RH, and cold-water pipes sweat. The existing framed wall contains fiberglass and paper-faced drywall.
Do not assume groundwater or assume condensation. Open a controlled inspection area, document the masonry and framing, check exterior drainage, measure indoor dew point and surface conditions, inspect pipes and air paths, and look for efflorescence or staining.
If humid-air condensation and damp porous finishes are confirmed, the plan may include removing damaged material, reducing indoor humidity, insulating cold pipes, installing a compatible continuous foundation-wall control layer, and rebuilding the service wall. If bulk water appears during a storm, that source changes the plan and must be handled first.
The useful output is not “use XPS.” It is a chain from symptom to source, source to assembly, and assembly to verification.
Contractor Scope Checklist
- Foundation type and existing layers documented
- Water-source investigation and repairs separated from insulation
- Wall, rim, and slab control layers drawn
- Drainage destination and failure path shown
- R-value and vapor-control basis tied to climate and code
- Foam fire protection and pest inspection detailed
- Framing kept clear of damp masonry and slab
- Radon test and retest assigned
- Combustion and ventilation review assigned
- Sump, cleanout, panel, shutoff, and service access preserved
- Concealed-work photos and inspection hold points required
- Drywall and flooring recovery details specified
- Humidity and leak monitoring handoff included
Monitor the Basement Through Its First Year
A final inspection captures one day. Basement moisture changes with spring thaw, heavy rain, summer dew point, winter stack effect, and household use. Create a 12-month check plan.
Record indoor temperature and relative humidity with a reliable logger at the lower level. Place it away from a dehumidifier discharge, exterior door, supply register, or cold pipe. Note rainfall, sump cycles, plumbing events, window condensation, odors, and dehumidifier runtime.
Inspect these locations after the first major storm and at seasonal change:
- wall-floor joint and sump;
- window wells and foundation penetrations;
- accessible rim joist and sill;
- base of finished walls and removable trim points;
- mechanical-room floor and drains;
- under sinks and around laundry equipment;
- slab and flooring transitions;
- exterior downspouts, grade, and discharge points.
Use leak sensors where a water heater, washer, sump, plumbing manifold, or low point creates a credible risk. Test alarms and backup power under the manufacturer's instructions.
If humidity rises, find the moisture source before increasing dehumidifier capacity. Check outdoor dew point, ventilation, air leakage, sump, drainage, plumbing, and wet materials. A dehumidifier that runs continuously may be revealing a source the construction did not resolve.
Retest radon after the renovation under the current health-authority protocol. Keep the baseline, post-work result, mitigation record if any, humidity log, concealed-work photos, and permits together. Give that packet to the next owner rather than reducing the project history to “finished basement.”
Frequently Asked Questions
Can I put fiberglass batts against a basement wall?
Air-permeable insulation directly against cold or damp masonry can allow condensation and hidden wetting. Use a designed assembly that separates sensitive material from the foundation and controls air and moisture.
Is rigid foam always the best basement insulation?
No. It is a common interior option, but foundation type, water, fire, pests, code, environmental goals, access, and drying needs determine the system.
Does waterproof paint fix a damp basement?
It may be one component in a suitable system, but it doesn't redirect runoff, repair drains, stop plumbing leaks, or automatically manage hydrostatic pressure.
Should I insulate the basement ceiling or walls?
That depends on whether the basement is inside the conditioned enclosure, where mechanical equipment and ducts sit, and how moisture and combustion are handled. A conditioned basement usually points toward wall insulation; an intentionally unconditioned space requires a complete floor-boundary design.
Do I need a vapor barrier on the inside?
Not as a universal rule. Below-grade walls need an assembly-specific vapor and drying strategy. Interior polyethylene over an air-permeable insulated wall can risk moisture in some assemblies.
When should I test for radon?
Test before major basement work or new lower-level occupancy and retest after the project according to current health-authority guidance.
Can I finish a basement that has a sump pump?
Possibly, but keep the sump accessible, sealed where required for soil gas, powered appropriately, alarmed if selected, and connected to a legal discharge. Design finishes for the remaining water risk.
What to Read Next
Read the vapor barrier versus retarder guide before closing the wall, then use the insulation payback by climate guide to price energy value without treating the whole utility bill as foundation loss.
Sources and Method
This refresh uses PNNL Building America foundation-wall and slab guidance, NRCan's basement retrofit guidance, and current EPA material on moisture, remodeling, mold, and radon. Exact assemblies, remediation, testing, fire protection, structure, egress, and code compliance require qualified local review.
About the Editorial Team EnergyBS reviews public program rules, product specifications, utility rates, and reader-facing cost assumptions. Treat savings figures as estimates until you verify local prices, permits, rebates, and contractor quotes.
Sources and Verification
- PNNL Building America Solution Center: Basement Wall Insulation
- PNNL Building America Solution Center: AirSealed, Insulated Basements
- Natural Resources Canada: Keeping the Heat In—Basement Insulation
- U.S. EPA: Remodeling Your Home and Indoor Air Quality
- U.S. EPA: Mold, Moisture and Your Home
- U.S. EPA: When to Retest for Radon
Editorial Review
EnergyBS Editorial Team
EnergyBS publishes practical homeowner guides. Important program, product, and cost claims should be checked against the linked source and local project documents before you commit to work.
Related Guides
View All ArticlesThe Physics of Air Sealing: Why Your RValue Doesn't Matter (If You Don't Seal)
Insulation is just a sweater. Air sealing is the windbreaker. We explain the physics of the Stack Effect, why Rvalues lie, and how to stop your home from leaking energy like a sieve.
Thermal Bridging: Why Your R20 Wall Acts Like R10
You paid for expensive insulation, but wood studs are conducting heat right through it. We explain 'The Ghosting Effect' and how Continuous Exterior Insulation solves the problem.
ICF Walls: The practical Thermal Envelope 2026 Tool
Insulating Concrete Forms (ICF) create a wall that is R25, airtight, and tornadoproof. Why wood framing is obsolete for highperformance homes.