Blower Door Test: What Is Your ACH50 Score? 2026 Analysis
Prepare for a calibrated blower door test, understand CFM50 and ACH50, map leakage safely, compare testin and testout results, and know what the score cannot tell you.
If You Don't Test, You Are Guessing: The practical Guide to Blower Door Testing
Short Answer: A calibrated blower door test measures whole-house air leakage at a controlled pressure, usually reported as CFM50 and ACH50. Use it to establish a baseline, locate leakage while the fan runs, scope air sealing, and verify the result with a test-out. The number does not identify every leak, measure duct leakage, or by itself prove that a home has adequate ventilation or safe combustion appliances.
You wouldn't buy a used car without checking the odometer. You wouldn't buy a computer without checking the RAM. Yet, millions of Americans buy homes—the most expensive asset of their lives—without knowing the single most important metric of build quality: ACH50.
A Blower Door Test is the only scientific way to measure how "leaky" your home is. Without it, you are just blindly caulking windows hoping it helps. (Spoiler: It usually doesn't).
In 2026, energy codes are stricter than ever. If you are building new, renovating, or just trying to stop your heating bill from exploding, you need this test.
Part 1: How the Test Works (The Science of Depressurization)
The physics are simple. To find a leak in a tire, you over-inflate it and look for bubbles. To find a leak in a house, we do the reverse: we suck the air out.
The Setup
An Energy Auditor (BPI or RESNET certified) arrives with a large red nylon frame and a calibrated high-velocity fan.
- Seal: They fit the frame into an exterior door (usually the front door).
- Calibrate: They connect digital manometers (pressure gauges) to the fan and to the outside air.
- Depressurize: The fan spins up, pulling air OUT of the house.
- Target: The fan automatically adjusts speed until the pressure difference between "Inside" and "Outside" hits exactly 50 Pascals.
Why 50 Pascals?
50 Pascals is roughly equivalent to a 20 MPH wind hitting all sides of your house simultaneously. It is a stress test. At this pressure, air is forced to rush In through every crack, gap, and failure point in your building envelope.
Part 2: The Score (ACH50 Explained)
The fan measures exactly how much airflow (in Cubic Feet per Minute, or CFM50) is needed to maintain that -50 Pascal pressure. Ideally, the fan should barely have to spin. In a leaky house, the fan screams at full speed just to keep up.
This CFM number is converted into ACH50 (Air Changes per Hour at 50 Pascals).
- Formula:
(CFM50 * 60) / Volume of House
The Scorecard (What is "Good" in 2026?)
| ACH50 Score | Verdict | likely Era | Efficiency Rating |
|---|---|---|---|
| 15.0+ | Disaster | Pre-1950 (Unrenovated) | The wind blows right through. Heating is impossible. |
| 8.0 - 12.0 | Leaky | 1970s - 1990s | Standard construction. Drafty windows, unsealed attics. |
| 5.0 - 7.0 | Average | 2000s | Typical "Code Built" home of the past. |
| 3.0 | The New Standard | 2021+ IECC Code | This is the mandatory limit for new homes in many states. |
| 1.5 - 2.0 | High Performance | Eco-Home | Very comfortable. Requires mechanical ventilation. |
| 0.6 | Passive House | Certified Passive | The global gold standard. Thermos-like efficiency. |
The Reality Check: Most older US homes test between 10 and 20 ACH50. This means that in a windstorm, all the air in your house is replaced every 3 to 6 minutes. You are paying to heat the neighborhood.
Part 3: Finding the Holes (The "Smoke & Mirrors")
The number tells you how bad it is. Use the test to find where it is bad.
While the fan is running at 50 Pascals, the auditor walks the house with two tools:
1. The Thermal Camera (Infrared)
Since cold outside air is rushing in through the cracks, an infrared camera paints a cheat-sheet on your walls.
- Blue Streaks across the ceiling? Your attic hatch or top-plates are unsealed.
- Blue Spots under the baseboard? Your sill plate (where the house meets the foundation) is leaking.
- Dark Windows? Actually, windows leak less than you think. The gaps around the window frame are usually the culprit.
2. The Smoke Pencil
A small puffer that releases chemical smoke.
- Hold it near an outlet. If the smoke shoots sideways, there is a leak behind the drywall.
- This is great for visualizing drafts for skeptical homeowners.
Part 4: The Usual Suspects (Where Your House Leaks)
People blame windows. People are wrong. Measurement data proves that windows account for only ~10% of leakage. The real monsters are hidden:
- The Rim Joist (Basement): Where the wood house sits on the concrete foundation. Often unsealed.
- Recessed Lights (Attic): Old "Can" lights are like chimneys. Heat rises right through them into the attic.
- The Attic Hatch: A piece of plywood sitting on a trim lip is not a seal. It needs a gasket and weight.
- Plumbing Penetrations: Look under your kitchen sink where the drain pipe goes into the wall. Is there a massive hole around the pipe? That hole goes straight to the damp crawlspace.
- Top Plates: In the attic, where the drywall meets the framing.
Part 5: The "Sick Building" Myth ("It Needs to Breathe!")
You will hear old contractors say: "Don't seal the house too tight! It needs to breathe to prevent mold!"
This is 100% false. It is the most dangerous myth in construction.
A house should "breathe," but it should breathe through a dedicated lung (Mechanical Ventilation), not through rotting cracks in the basement.
- "Natural" Leakage: Air comes in through the crawlspace (radon, mold), the garage (car exhaust), and the attic (fiberglass dust). It is uncontrolled and dirty.
- Mechanical Ventilation: An ERV (Energy Recovery Ventilator) brings in filtered fresh air and pushes out stale air, recovering the heat in the process.
The Mantra: "Build Tight, Ventilate Right." You want the tightest possible envelope (ACH50 < 1.0) paired with a mechanical fresh air system. This grants you total control over indoor air quality.
Part 6: Cost & Logistics
How much does a test cost?
- Standalone Test: $300 - $500.
- Part of an Energy Audit: Often subsidized. In states like Massachusetts (Mass Save) or NY (NYSERDA), it might be free or heavily discounted ($50).
When should you test?
- Pre-Renovation: To set a baseline.
- "Mid-Construction" (The most important one): If you are building an addition or a new house, test before drywall goes up.
- If you fail the test at the drywall stage, you can find the leaks and foam them.
- If you fail the test at the final inspection, it is too late to fix anything cheaply.
Can I DIY it?
A homeowner can perform visual and low-pressure draft checks, but a reportable CFM50 or ACH50 result requires calibrated equipment, correct building-volume inputs, a defined test boundary, and safe preparation of combustion equipment. Hire a qualified practitioner when the number will guide a major retrofit, code decision, ventilation design, incentive claim, or contractor payment.
Summary
If you are spending $20,000 on new windows to save energy, stop. Spend $400 on a Blower Door test first. It will likely reveal that for $1,000 in spray foam and caulk, you can achieve double the savings of those new windows.
Measure, don't guess.
A blower door measures leakage through the building enclosure, not leakage through the HVAC distribution system. If ducts run through an attic, garage, or vented crawlspace, pair this result with the duct leakage testing and sealing guide so total duct leakage, leakage to outdoors, and static pressure are not mistaken for the same metric.
Define the Test Boundary Before Reading the Number
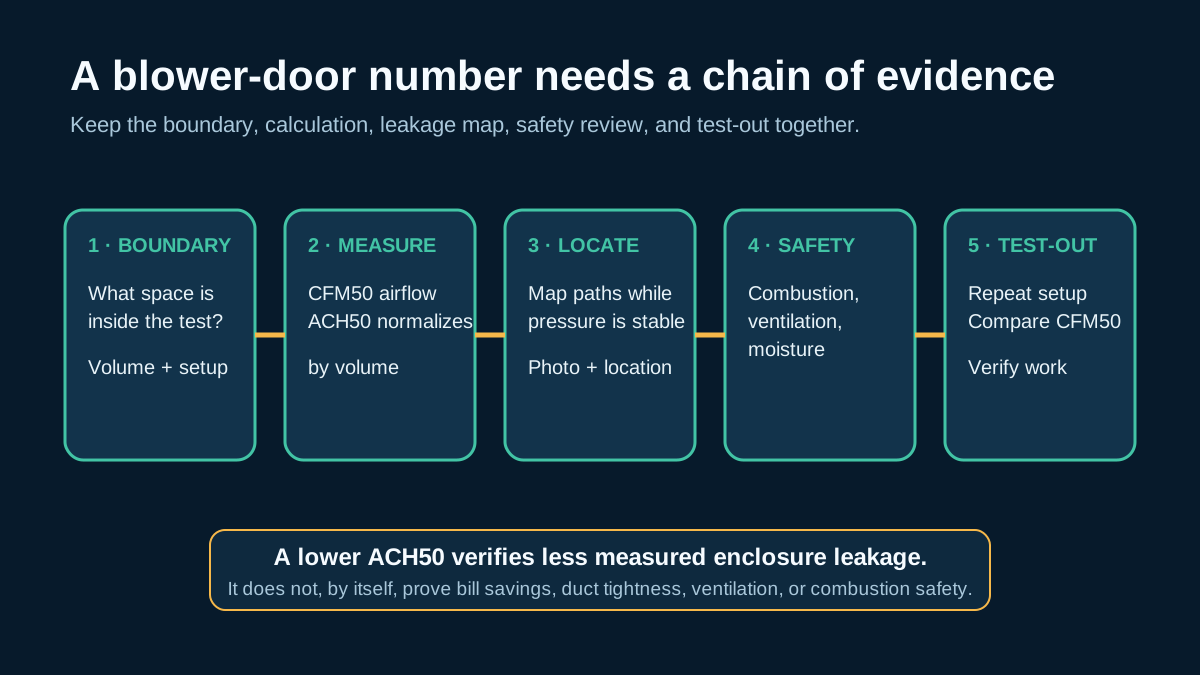
The reported result only makes sense when you know what space the test included. Ask the practitioner to identify the pressure boundary: the surfaces separating conditioned space from outdoors, garages, attics, crawlspaces, and neighboring units. Interior doors are normally arranged so conditioned rooms communicate during the test, while exterior openings and intentional devices are prepared under the selected protocol.
Do not compare two ACH50 numbers until these items match:
- conditioned building volume used in the calculation;
- which basement, crawlspace, attic, porch, or addition was inside the boundary;
- whether attached garages or neighboring units could contribute leakage;
- test direction and pressure points;
- treatment of fireplaces, dampers, exhaust openings, and intentional ventilation;
- weather and pressure limitations recorded by the tester.
For an attached dwelling, a single-unit test can include air moving through party walls or floors from neighboring space. NREL notes that guarded testing is more appropriate when the goal is to isolate leakage to outdoors. A condo result therefore should not be interpreted exactly like a detached-house result without checking the method.
CFM50 and ACH50 Answer Different Questions
CFM50 is the fan airflow, in cubic feet per minute, needed to maintain a 50-pascal pressure difference. It is a whole-building leakage quantity. ACH50 normalizes that airflow by the building volume:
ACH50 = CFM50 × 60 ÷ conditioned building volume in cubic feet
Worked example: a house measures 1,600 CFM50 and has 20,000 cubic feet inside the tested boundary. Its result is 1,600 × 60 ÷ 20,000 = 4.8 ACH50.
If the volume was mistakenly entered as 16,000 cubic feet, the same airflow would be reported as 6.0 ACH50. That is why the geometry sheet belongs in the report. Floor area alone is not enough when ceiling heights, kneewalls, basements, or additions differ.
ACH50 is useful for comparing the same home before and after work and for normalized program or code requirements. It is not the number of natural air changes the home experiences every ordinary hour. Wind, temperature difference, exposure, height, shielding, and leakage distribution govern natural infiltration. Do not convert ACH50 to a yearly heating-cost promise with an unexplained universal divisor.
Prepare the House Without Hiding Its Problems
Before the appointment, send the tester the home's fuel types, appliance list, fireplace type, ventilation equipment, recent alterations, known moisture or odor issues, and any areas that are inaccessible. Ask for the provider's preparation instructions because protocols and safety procedures differ.
Make these practical preparations:
- clear access to exterior doors, attic and crawlspace entries, mechanical equipment, and representative leakage locations;
- secure pets and identify alarms, delicate ash, loose papers, and doors that may move;
- collect plans or measurements that help define conditioned volume;
- list drafts, ice dams, condensation, odors, smoke events, and rooms that are hard to heat or cool;
- preserve 12–24 months of bills where available so leakage is interpreted in context;
- tell the practitioner about asbestos-containing materials, vermiculite, lead dust, active mold, pest contamination, or unsafe access before disturbance.
Do not seal suspicious openings immediately before the baseline. Mark them for investigation. The test should represent a documented building condition that can be reproduced at test-out.
Use the Fan to Map Leakage, Not Merely Produce a Score
Once the pressure is stable and the practitioner confirms it is safe to investigate, trace air paths systematically. Start at the top and bottom of the enclosure where stack-driven leakage often concentrates: attic hatches, plumbing and wiring penetrations, dropped ceilings, chimney and flue chases, rim joists, sill plates, crawlspace transitions, and basement penetrations.
Then check connections and changes in geometry: additions, bay windows, porch roofs, kneewalls, attached garages, cantilevers, soffits, recessed fixtures, tub surrounds, and service penetrations. Windows and doors may be noticeable, but a moving curtain is not proof that replacement windows are the best first project. Air can enter at trim after traveling through a larger concealed path.
Use smoke, theatrical fog, or infrared imaging only under the practitioner's safety direction. ENERGY STAR's consumer guidance tells homeowners to turn off combustion appliances before a DIY smoke check. A professional test should use a defined combustion-safety procedure, not an improvised flame near unknown drafts. Never use smoke where it could trigger a fire system, contaminate a sensitive home, or contact combustible material.
Create a leakage register with location, photo, apparent path, proposed material, access requirement, trade responsible, and verification method. Distinguish a visible entry point from the actual exterior breach. Sealing only the interior symptom can redirect air or risk moisture if the assembly has not been understood.
Treat Airtightness, Ventilation, and Combustion as One System
Lower leakage can reduce uncontrolled outdoor air, but the home still needs managed ventilation and safe pressure relationships. ENERGY STAR defines diagnostic work as including air-leakage and combustion-safety testing, and NRCan's EnerGuide materials identify ventilation and pressure-induced spillage among the reasons for blower-door evaluation.
Before aggressive air sealing, ask how the project will address:
- combustion appliances that use indoor air or share a pressure zone;
- kitchen, bath, clothes-dryer, and central-vacuum exhaust;
- fireplaces and wood-burning equipment;
- attached-garage separation;
- radon, soil gas, moisture, and pollutant sources;
- existing HRV, ERV, or other mechanical ventilation;
- replacement-air needs and local code or program requirements.
An ACH50 target is not a ventilation design. If test-out shows a much tighter enclosure, the project team should confirm that the ventilation and combustion plan remains appropriate. Read the HRV and ERV ventilation guide before treating random leakage as the desired fresh-air system.
Specify Test-In and Test-Out in the Air-Sealing Contract
Record the baseline CFM50, ACH50, volume, boundary, protocol, test conditions, and major leakage sites. Then define the work by accessible paths and assemblies, not by a guaranteed percentage that ignores hidden conditions. The contractor should identify exclusions, materials, fire-rated locations, moisture-sensitive assemblies, and areas requiring another trade.
At test-out, reproduce the boundary and setup. Compare both CFM50 and ACH50, confirm that building volume did not change, and document any intentional openings treated differently. Calculate the reduction:
Leakage reduction = (baseline CFM50 − final CFM50) ÷ baseline CFM50 × 100
Example: a reduction from 1,600 to 1,200 CFM50 is 25%. That number verifies the enclosure change; it does not promise a 25% bill reduction. Heating and cooling are only part of household energy, and conductive losses, ducts, equipment, weather, behavior, and tariffs remain.
Require post-work safety checks and a revised leakage map. A lower score with an unresolved combustion or moisture concern is not a successful handoff.
What a Complete Blower Door Report Should Include
- property and test date;
- practitioner and equipment identification;
- applicable procedure or program;
- test boundary and building-volume calculation;
- house setup and intentional-opening treatment;
- weather and pressure observations;
- CFM50, ACH50, and supporting test points;
- limitations, anomalies, and attached-space concerns;
- photos or notes locating material leakage paths;
- test-in/test-out comparison when applicable;
- ventilation and combustion-safety findings or clearly stated exclusions;
- recommended next diagnostics, including duct leakage where relevant.
Keep the report with retrofit invoices and photographs. It becomes the baseline for later work, HVAC sizing, ventilation discussions, and buyer documentation.
Procure the Test as a Defined Service
Ask each provider to quote the same deliverable. A low price for a single number is not comparable with a diagnostic visit that includes house preparation, boundary documentation, leakage mapping, safety work, a written report, and a return test.
Use this request for proposal:
| Service element | Confirm in writing |
|---|---|
| Baseline test | Method, reported metrics, building volume, and boundary |
| Leakage investigation | Time allowance, tools, photos, and homeowner participation |
| Safety | Combustion and ventilation procedure, qualifications, and exclusions |
| Retrofit support | Marked locations, scope notes, contractor coordination |
| Test-out | Timing, reproducible setup, report comparison, failed-target process |
| Data ownership | Raw readings, photographs, model files, and sharing rights |
If the test supports an incentive, code inspection, energy label, or financing condition, verify the required provider and procedure with the responsible program before booking. A technically useful test can still be ineligible for a program if the provider, timing, or documentation does not meet its rules.
Separate diagnostic fees from air-sealing work. When the same company tests and installs, define the baseline before the work price changes, retain the raw result, and specify who judges acceptance. For a large project, an independent test-out can provide clearer quality control.
Handle Missed Targets and Unexpected Results
A contract target should include a response plan. If test-out misses the agreed level, the parties should review unchanged setup, remaining accessible leakage, exclusions, concealed conditions, and whether added sealing would create ventilation, moisture, fire, or combustion concerns. Do not chase the last leakage point without considering risk and cost.
If the result changes far more than expected, first check boundary and data consistency. Was a basement door, fireplace damper, attic hatch, pet door, or intentional vent treated differently? Did the conditioned volume change? Was one test taken during unsuitable wind? Were temporary construction openings present? Preserve both readings and ask the practitioner to explain the discrepancy before attributing it to workmanship.
If the final home is tighter but comfort is unchanged, investigate distribution, room airflow, insulation continuity, solar gain, controls, and equipment operation. The blower door answered the enclosure-leakage question; it did not eliminate other causes. Conversely, improved comfort with a modest CFM50 change may mean a strategically important leak was sealed even though the whole-house percentage looks small.
The handoff should say what remains unknown. Examples include inaccessible kneewalls, shared-wall leakage, ducts not tested, combustion appliances outside the provider's scope, or ventilation flow not measured. Those limitations become the next diagnostic list rather than disappearing behind a passing score.
Frequently Asked Questions
Is a lower ACH50 always better?
Lower measured leakage generally means less uncontrolled airflow, but the result must be paired with moisture control, mechanical ventilation, safe combustion, and appropriate exhaust makeup. The best target depends on the home, climate, systems, and applicable program.
Why test at 50 pascals?
The controlled pressure makes leakage measurable and repeatable with calibrated equipment. It is a diagnostic condition, not ordinary indoor pressure.
Can I compare my ACH50 with a neighbor's?
Only cautiously. Volume, boundary, attachment, height, geometry, and test protocol can differ. Before-and-after results on the same home are usually more actionable.
Does a blower door find duct leaks?
Not by itself. Use duct-specific testing, especially when ducts cross unconditioned space.
Should testing happen before or after insulation?
Test before work for a baseline, during construction while leakage paths remain accessible when practical, and after work to verify the final condition.
Will ACH50 predict my exact energy savings?
No. It is one input. A savings estimate also needs climate, temperatures, equipment, conductive losses, fuel prices, and household operation.
What to Read Next
Use the air-sealing stack-effect guide to understand why leaks at the top and bottom of a house often deserve attention before window trim. Then use the professional home energy audit guide to place the leakage result in a complete retrofit sequence.
Sources and Method
This guide uses DOE homeowner assessment guidance, ENERGY STAR's definitions and assessment workflow, NREL's Home Energy Score data treatment, and NRCan's EnerGuide testing rationale. Exact test setup, safety steps, program thresholds, and ventilation requirements must come from the qualified practitioner and the rules governing the property.
About the Editorial Team EnergyBS reviews public program rules, product specifications, utility rates, and reader-facing cost assumptions. Treat savings figures as estimates until you verify local prices, permits, rebates, and contractor quotes.
Sources and Verification
Editorial Review
EnergyBS Editorial Team
EnergyBS publishes practical homeowner guides. Important program, product, and cost claims should be checked against the linked source and local project documents before you commit to work.
Related Guides
View All ArticlesElectrical Panel Capacity for Home Electrification
A decision guide for homeowners adding heat pumps, EV charging, induction, water heating, solar, or batteries: service ratings, load calculations, demand data, panel space, load management, project sequencing, and quote review.
Smart Thermostat Savings by Region 2026 Tool
How much money does a smart thermostat actually save? We analyze weather data, utility rates, and regional climate differences across North America to calculate the real ROI of smart heating and cooling control.
Why Are Electricity Rates Increasing in 2026? Causes and Solutions
Electricity rates are surging across North America and Europe in 2026. We explain the underlying causes—from grid modernization to AI data center demand—and provide actionable strategies to protect your household budget.