DIY Home Energy Audit: Find Air Leaks Yourself (2026)
Run a safe DIY home energy audit using bills, visual evidence, simple draft checks, plugload measurements, and disciplined documentation—then know when professional diagnostics are required.
You're the Detective
Short Answer: A DIY energy audit can document bills, comfort problems, accessible insulation, obvious air leaks, equipment condition, lighting, and plug loads. It cannot safely replace calibrated blower-door, duct-leakage, combustion-safety, moisture, or electrical diagnostics. Start with observation and measurement, avoid disturbing hazardous materials or fuel-burning equipment, and use the results to request a focused professional assessment when needed.
A careful walk-through can reveal accessible problems without paying for diagnostic equipment. It can also organize symptoms and measurements so a professional visit is more focused. Calibrated air-leakage and duct tests, combustion-safety evaluation, moisture diagnosis, and interpretation of hidden assemblies remain professional work.
This guide will teach you to see what's been invisible. You'll learn to read your house like a patient, diagnosing its symptoms and locating the sources of pain.
By Sunday evening, you'll have a prioritized hit list of exactly what to fix and where. That information is worth far more than $40.
The Toolkit: Equipping Your Investigation
You probably own half of this already:
Essential:
- Infrared Thermometer (Laser Temperature Gun): The core diagnostic tool. Point, click, read the surface temperature. $20-30 on Amazon or at any hardware store.
- Smoke Source: Incense sticks are perfect—cheap, safe, produce consistent visible smoke. A cigarette works too. If you vape, that's actually ideal (thick visible vapor).
- Painter's Tape or Sticky Notes: To mark problems as you find them. You'll forget locations otherwise.
- Flashlight/Headlamp: You're going into dark places.
- Dust Mask and Old Clothes: Attics are filthy. Don't wear anything you care about.
Optional but Useful:
- Thermal Camera (FLIR One, Seek): These phone attachments ($200-400) turn temperature into visible color. They show problems you'd miss with a point thermometer. Worth it if you're serious about building science; skippable if this is a one-time audit.
- Outlet Gasket Kit: $5. Since you'll find leaky outlets, you might as well have the fix ready.
- Notepad or Phone Notes: Document everything with photos. Your future self will thank you.
Phase 1: The Pressure Test (Finding Air Leaks)
Air leaks are invisible. You can't see air moving through a crack. But you can see smoke—and smoke will reveal every leak if you set up the test correctly.
Creating Negative Pressure
First, you need to exaggerate your home's natural infiltration so that leaks become obvious.
Step 1: Close everything. All windows, all exterior doors, the fireplace damper, any flues.
Step 2: Turn on every exhaust device simultaneously. The goal is maximum air removal:
- Bathroom exhaust fans (all of them)
- Kitchen range hood
- Dryer (just run it on air fluff, no clothes)
With all these fans running, you're pumping indoor air outside. Your house becomes slightly depressurized—think of it as pulling a gentle vacuum from the inside. This forces outdoor air to rush in through any cracks it can find.
The Smoke Walk
Now walk the perimeter of your home with your smoke source lit. Move slowly and systematically—rushing means missing.
What to Check:
Windows: Hold the smoke along the sash edges (where the moving parts meet the frame), the meeting rail (where upper and lower sashes overlap), and where the frame meets the wall.
Doors: Run smoke along all four sides of the door frame, especially the bottom. Don't forget the door to the garage—that's often a massive leak.
Electrical Outlets and Switches: On exterior walls, outlets can leak badly. Pop off the cover plate and hold smoke where the box meets the drywall.
Baseboards and Trim: Where the baseboard meets the floor, where door trim meets the wall—these are hidden highways for air.
Recessed Lights: If you have can lights, hold smoke near the gap between the trim and ceiling.
The Attic Hatch: This is usually the single biggest leak in the house. Watch the smoke along the hatch frame. If it gets sucked viciously, you've found a priority target.
Plumbing and HVAC Penetrations: Anywhere pipes or ducts pass through floors, walls, or ceilings.
Marking the Crime Scenes
When you find a leak—the smoke visibly swooshes toward a crack—slap a piece of painter's tape nearby. You're building a hit list. Don't try to fix anything yet; just diagnose.
By the end of this phase, your house will be decorated with blue tape flags. That's good. That's the map you'll use to plan your air sealing weekend.
Phase 2: The Thermal Scan (Finding Insulation Problems)
Your IR thermometer reveals temperature variations that indicate insulation issues. But to use it effectively, you need sufficient thermal difference between inside and outside.
Ideal Conditions:
- At least 20°F difference between indoor and outdoor temperature
- Nighttime in winter is perfect (cold outside, warm inside, no solar interference)
- Summer evening after a hot day works too (hot walls, cooled interior)
Scanning Walls
With your heating/cooling running to establish a baseline, walk through the house pointing your laser thermometer at walls.
What You're Looking For:
- Baseline: A wall at room temperature—probably 68-70°F if you're heating.
- Corner Cooling: Exterior corners are typically 5-8°F cooler than wall centers. That's normal—more surface area, more wood, less insulation. Don't panic unless it's extreme (15°F+ difference, or visible frost in extreme cold).
- Random Cold Spots: A section of wall that's 55°F when the rest is 68°F? That's an insulation void. Fiberglass batts can settle, slide, or never have been installed in a particular stud bay. Mark it.
How to Confirm: If you can access the wall from outside (like an attached garage) or from the attic above, investigate. You may find the insulation shifted or compressed. Sometimes builders simply skip bays.
Scanning Ceilings
Point up. Scan the ceiling below your attic.
- Even Temperature: The whole ceiling should read roughly the same temperature—a degree or two variation is normal.
- Cold Patches: A localized cold spot suggests thin or missing insulation above. Mark it, then check from the attic side.
Scanning Floors
Floors over unconditioned spaces (above garages, crawlspaces) often leak heat downward.
- Point the thermometer at the floor. If it's much colder than the air temperature, insulation under that floor may be inadequate or falling out of the joist bays.
Phase 3: The Vampire Hunt (Finding Phantom Loads)
This is the fun phase. Turn off all the lights in the house after dark and become the hunter.
The Night Walk
Walk every room slowly. What's glowing?
- Cable boxes with clocks
- Standby lights on TVs
- Gaming consoles showing power indicators
- Chargers (phone, laptop, tablet) with LEDs
- Your router (less avoidable, but worth noting)
- Coffee maker clocks
- Printer power lights
- Smart speakers (you probably don't want to unplug Alexa, but know what she costs)
These are your vampire loads—devices that draw power 24/7 even though they're "off." An average household has $100-200/year in vampire loads. Your cable box alone might cost you $25/year to do nothing but show the time.
Quantifying the Problem
For bonus points, use a Kill-A-Watt meter ($25). Plug devices into it and let it measure consumption over 24 hours. You'll be horrified at what your DVR uses.
The Fixes
- Smart Power Strips: Plug your entertainment center into a strip with a master outlet. When the TV turns off, everything else does too.
- Just Unplug: That guest room TV with a Roku you use twice a year? Unplug it. The instant-on convenience isn't worth $15/year.
- Timer Strips: Put seldom-used devices (printers, shop equipment) on timers that only provide power during working hours.
Phase 4: The Attic Exploration
This is the phase most homeowners skip because attics are unpleasant. But the information you gain here is invaluable.
Safety Notes:
- Wear long sleeves, pants, gloves, and a dust mask.
- Step only on joists or walkable boards. Never step on drywall—you'll go through the ceiling.
- Bring a good headlamp.
Insulation Assessment
Can you see joists? If yes, you don't have enough insulation. Current code calls for R-38 to R-60 depending on climate—that's 10-16+ inches of fiberglass or cellulose. If you can see wood, you have less than R-25.
Is it level? Blown-in insulation should be an even blanket with no obvious low spots.
Is it dirty? Blackened streaks in fiberglass mean air is passing through it. The insulation is acting as a filter, catching dust from moving air. Where you see dirt, you have an air leak underneath. Lift the insulation—you'll find an unsealed penetration.
Checking Air Sealing (From Above)
With your flashlight, examine:
- The top plates of walls (the 2x4s that cap interior walls). Are penetrations sealed?
- Any recessed light housings. Are they IC-rated airtight or old-style vented?
- Plumbing stacks and vents. Is foam or caulk visible around them, or are there gaps?
- The attic hatch from above. Does light from below leak around the frame?
Signs of Moisture Problems
- Wet Nails: Frost or condensation on the nail tips sticking through sheathing means moisture is reaching the attic from below. Air sealing usually solves this.
- Staining on Sheathing: Dark stains on the underside of roof sheathing suggest current or past leakage—either roof leaks or vapor condensation.
- Mold on Framing: Visible mold means a serious moisture issue. This may require professional assessment.
Phase 5: The Report Card
You've now surveyed your entire house. You have tape markers on air leaks, notes on cold spots, a list of vampire loads, and attic observations.
Now prioritize. Not everything matters equally.
Tier 1 (Fix This Weekend):
- The attic hatch
- Major air leaks at plumbing penetrations
- Vampire loads (free to fix—just unplug things)
Tier 2 (Fix This Month):
- Rim joist sealing
- Recessed light air sealing
- Electrical outlet gaskets
Tier 3 (Plan For):
- Adding attic insulation
- Addressing wall insulation voids
- Window or door weatherstripping
Tier 4 (Get Professional Help):
- Blower door test for quantified results
- Combustion safety analysis if you have gas appliances
- Detailed duct leakage testing
Conclusion: Knowledge Is Power (Savings)
Your house has been whispering its problems all along. Cold drafts announce air leaks. Cold spots reveal insulation gaps. Glowing LEDs advertise wasted electricity. You just needed the tools to hear.
For $40 and a Saturday, you now have a detailed understanding of where your home bleeds energy. That knowledge is the foundation for every improvement you make.
The fixes for most of what you found are cheap—caulk, foam, weatherstripping, smart power strips. Spend your next weekend addressing Tier 1 and 2. You'll see the difference in next month's utility bill.
Stop guessing. Start measuring. Be the detective your house needs.
Set Safety Boundaries Before the Walk-Through
A DIY audit is observational. Do not open electrical panels, remove equipment covers, disconnect fuel appliances, enter an unsafe attic or crawlspace, step on concealed ceiling surfaces, disturb vermiculite or suspect asbestos, cut into painted assemblies that may contain lead, or investigate active mold without appropriate professional advice.
Stop and call a qualified provider when you find fuel odor, a carbon-monoxide alarm, scorch marks, damaged wiring, active water entry, structural movement, significant contamination, unsafe access, or combustion venting concerns. A possible health or fire issue outranks the energy checklist.
ENERGY STAR's DIY smoke-check guidance says combustion appliances should be turned off before using exhaust fans to create negative pressure. If you do not know how to put equipment into a safe state, skip that exercise. Never use an open flame to trace leaks.
Start With Bills and a Household Change Log
Download at least 12 consecutive months of electricity and every heating fuel. Record consumption units, not only dollars, because tariffs and fuel prices can change. Mark estimated meter reads, vacancies, guests, work-from-home periods, EV charging, new appliances, equipment failures, thermostat changes, and renovations.
Build a simple monthly table:
| Month | Electricity kWh | Gas/fuel quantity | Cost | Heating/cooling note | Household change |
|---|---|---|---|---|---|
| January | Cold/windy? | ||||
| July | Hot/humid? |
Compare similar seasons rather than adjacent months. EPA's Home Energy Yardstick can benchmark annual use against similar homes, but ENERGY STAR says it does not replace a professional audit. Treat the score as a screening signal, not a diagnosis.
If the bill is high, separate major end uses where possible: space heating, cooling, water heating, EV, pool or spa, dehumidification, cooking, and plug loads. One new EV can increase electricity while total household fuel use and emissions fall; the utility total alone may hide that shift.
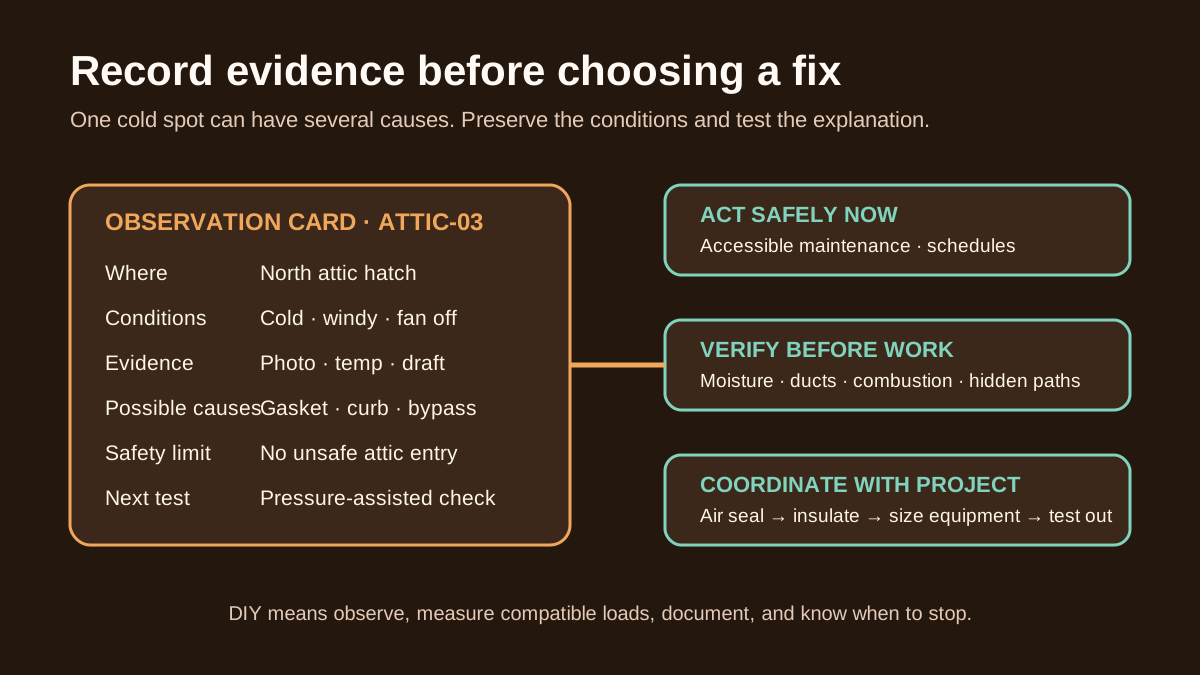
Create an Evidence Board, Not a Shopping List
For every finding, capture:
- room and exact location;
- date, time, weather, and wind;
- indoor temperature and relative humidity if available;
- equipment operating at the time;
- normal-light photograph;
- thermal image or instrument reading, if used;
- symptom and frequency;
- safe temporary action;
- professional question or proposed verification.
Give each observation an ID such as ATTIC-03 or BED2-01 and place the same ID on photographs and your floor plan. This prevents a contractor from quoting “seal attic” without knowing which bypasses were observed.
Do not convert the first explanation into a fact. A cold surface might reflect missing insulation, wind washing, thermal bridging, low indoor airflow, moisture, or simply outdoor exposure. Record competing explanations and the test that could distinguish them.
Use Infrared Images With Controls
An infrared camera displays surface temperature patterns; it does not see through walls or directly measure heat loss. Reflections from glass, metal, glossy paint, and tile can look like hot or cold defects. Sun, rain, wind, indoor equipment, rugs, furniture, and recent thermostat changes can distort the pattern.
For a more useful scan:
- choose a period with a stable indoor-outdoor temperature difference;
- avoid recently sun-heated exterior surfaces;
- record indoor and outdoor conditions;
- compare similar assemblies, such as two corners on the same exposure;
- take a normal photograph from the same position;
- repeat suspicious images under different conditions;
- confirm moisture concerns with appropriate methods rather than thermal appearance alone.
A plug-in infrared thermometer measures one spot and can help compare surfaces, but it does not replace an imager. Neither tool quantifies whole-house leakage. Use the blower door test guide when the retrofit needs a calibrated baseline.
Audit the Attic From a Safe Access Point
If the attic cannot be entered safely, observe from the hatch and use a qualified professional. Do not compress insulation or step between structural members. Photograph insulation depth at representative accessible points, gaps around the hatch, displaced material, dark dust patterns, wet or matted areas, pest evidence, and visible penetrations.
Keep these diagnoses separate:
- air leakage through the ceiling plane;
- conductive heat flow through insulation;
- bulk roof or flashing leak;
- condensation from indoor moisture;
- ventilation configuration;
- duct leakage or inadequate duct insulation.
Adding insulation over an active moisture source or unsealed bypass can conceal the problem. Air sealing around chimneys, flues, recessed fixtures, and electrical components also requires compatible clearances and materials. Mark these for trained work.
Inspect the Foundation and Attached Garage Interface
At the basement or crawlspace, look for water stains, efflorescence, damp odors, exposed soil, disconnected ducts, unsealed penetrations, damaged rim insulation, and gaps at the sill. Note whether the space is intended to be inside or outside the conditioned enclosure; a recommendation that mixes those strategies can create moisture or comfort problems.
At an attached garage, check weatherstripping and visible separation around the door to the house, plumbing, wiring, ducts, and framing transitions. Do not intentionally depressurize the house in a way that could draw garage pollutants indoors. Odor transfer deserves professional evaluation even when the opening seems small.
Measure Plug Loads Without Overstating Them
A plug-in meter can measure compatible 120-volt appliances over time. Record watts while operating, standby watts, measurement duration, and energy in kWh. Refrigerators, freezers, dehumidifiers, and pumps cycle, so a momentary reading is not annual consumption.
Estimated annual energy = measured average watts × annual operating hours ÷ 1,000
Example: a device averaging 6 watts continuously uses about 52.6 kWh per year: 6 × 8,760 ÷ 1,000. Multiply by the applicable energy rate for a planning cost. Do not include fixed utility charges as avoidable savings.
Follow meter and appliance ratings. Do not meter hardwired equipment or high-load appliances with an incompatible device. For an appliance replacement decision, use measured energy, condition, repair cost, capacity needs, and expected replacement performance—not standby power alone.
Turn Findings Into a Three-Column Action Plan
Sort the evidence into:
| Act safely now | Verify before work | Coordinate with planned project |
|---|---|---|
| Replace failed accessible weatherstripping; adjust schedules; remove unnecessary plug loads | Hidden moisture; recurring drafts; insulation voids; duct leakage; combustion or pressure concern | Air sealing before insulation; enclosure work before HVAC sizing; roof work before solar |
For each action, identify the baseline and how success will be checked. A weatherstrip can be visually and functionally inspected. A large air-sealing package calls for test-in and test-out. Duct work needs leakage and airflow evidence. An HVAC replacement needs load calculation and commissioning.
Use the professional energy audit guide to write a focused scope from your evidence instead of buying the first product offered.
Repeat the Audit in the Opposite Season
Some symptoms only appear under winter stack effect, summer solar gain, wind from one direction, or humid shoulder-season conditions. Preserve your first evidence board and repeat the comfort log and selected measurements in the opposite season.
After a repair, compare the same location under similar conditions. Also track monthly energy in context. Weather, occupants, rates, and new equipment can obscure the result; document changes rather than promising that one caulk tube will create a specific bill reduction.
Frequently Asked Questions
Can a DIY energy audit replace a professional audit?
No. It is a useful screen and evidence-gathering exercise. It cannot reproduce calibrated leakage tests, combustion-safety work, diagnostic modeling, or expert interpretation of concealed assemblies.
Is incense safe for finding drafts?
Only under suitable conditions and with combustion equipment safely handled. Skip smoke if you are unsure, have respiratory sensitivity, a fire-system concern, or fuel-burning equipment you cannot safely manage.
Do I need a thermal camera?
No. Bills, comfort logs, visual inspection, paper tests, and plug-load measurements can reveal useful priorities. A camera adds surface-pattern evidence but requires careful interpretation.
How much temperature difference is needed for thermal imaging?
There is no single homeowner rule that works for every camera and assembly. Follow the equipment guidance and professional procedure; stable conditions and a larger indoor-outdoor difference generally make enclosure patterns easier to interpret.
Should I seal every draft I find?
No. Identify the assembly, moisture path, fire or electrical clearance, combustion implications, and intended ventilation first. Some locations require specific rated materials or a qualified trade.
What data should I give an auditor?
Provide bills by fuel, the household change log, floor plan, symptom map, photographs, measurements, renovation history, equipment list, and your highest-priority comfort or safety questions.
What to Read Next
Use the air-sealing science guide to understand the paths you mapped, then read the summer electric-bill troubleshooting guide when cooling-season usage—not drafts—is the main problem.
Sources and Method
This homeowner workflow uses ENERGY STAR's current DIY inspection guidance and Yardstick limitations plus DOE and ENERGY STAR professional-assessment elements. It deliberately limits DIY work to observation and compatible consumer measurements; local safety rules, hazardous materials, electrical work, fuel appliances, and diagnostic testing require qualified advice.
About the Editorial Team EnergyBS reviews public program rules, product specifications, utility rates, and reader-facing cost assumptions. Treat savings figures as estimates until you verify local prices, permits, rebates, and contractor quotes.
Appliance Upgrade ROI Tool
Determine exactly when to replace your appliances for maximum savings. Our advanced modeling tool has been centralized at CalculatorVillage.com.
Start AnalysisSources and Verification
Editorial Review
EnergyBS Editorial Team
EnergyBS publishes practical homeowner guides. Important program, product, and cost claims should be checked against the linked source and local project documents before you commit to work.
Related Guides
View All ArticlesElectrical Panel Capacity for Home Electrification
A decision guide for homeowners adding heat pumps, EV charging, induction, water heating, solar, or batteries: service ratings, load calculations, demand data, panel space, load management, project sequencing, and quote review.
Smart Thermostat Savings by Region 2026 Tool
How much money does a smart thermostat actually save? We analyze weather data, utility rates, and regional climate differences across North America to calculate the real ROI of smart heating and cooling control.
Why Are Electricity Rates Increasing in 2026? Causes and Solutions
Electricity rates are surging across North America and Europe in 2026. We explain the underlying causes—from grid modernization to AI data center demand—and provide actionable strategies to protect your household budget.